[ad_1]
What is header bidding?
Header bidding, also called advance bidding or pre-bidding, allows publishers to simultaneously offer ad space for sale to many SSPs or ad exchanges. The technology is based on prebid.js – a free and open-source library that ensures a quick integration.
By permitting multiple bidders to place bets on the same inventory simultaneously, publishers increase their efficiency and receive the maximum profit, as only the highest bidder wins.
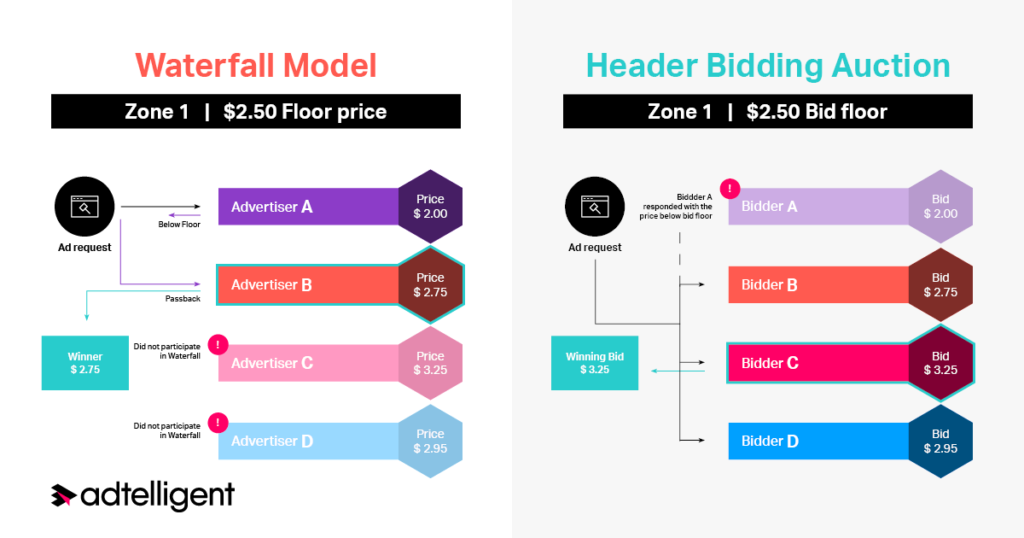
Before the widespread use of header bidding, the waterfall model offered impressions through a linear sale channel. If a buyer does not win a bid, the ad opportunity is passed to the next one until someone agrees to pay the requested price. Unfortunately, this model excludes the opportunity to provide impressions to the most interested party for the best-offered price, making publishers less efficient and profitable.
On the graph below, you can see the outcome of such a system – lower bids often win due to the nature of the waterfall model; with header bidding – the highest price always wins. You can find out more about the mechanics of the bidding processes in our blog post on the topic.
Why do publishers need header bidding?
According to recent data, 13% of websites among the top 100 thousand and 27% among the top 10 thousand use header bidding technology, which is rapidly growing.
Header bidding is gaining popularity among publishers, and here is why:
- First, it brings transparency to the publisher’s workflow by providing more control over sales processes.
- Maximizes profits per impression and boosts revenues; as the model ensures the highest CPM winning, it shifts the profits and benefits for publishers.
- Improves user experience and load speed due to the nature of the real-time auction provides wider exposure of one’s inventory through SSP/DSP.
- Excellent reporting quality due to the absence of sequential chaining.
- The auction gives insights about bids before the start, giving the publisher more control and the ability to predict revenues more accurately.
- Increase competition rates. Header bidding ensures more advertisers bid on the purchase of the ad space, thus increasing the competition for the impression, which in turn is beneficial for the publisher.
Not only publishers benefit from implementing the header bidding model, but also the advertisers. It helps bring equal opportunities to all advertisers, no matter the size and even if they do not buy via Google. Advertisers also gain access to the premium inventory and always have a chance to buy it as long as they offer an acceptable price.
What is header bidding wrapper?
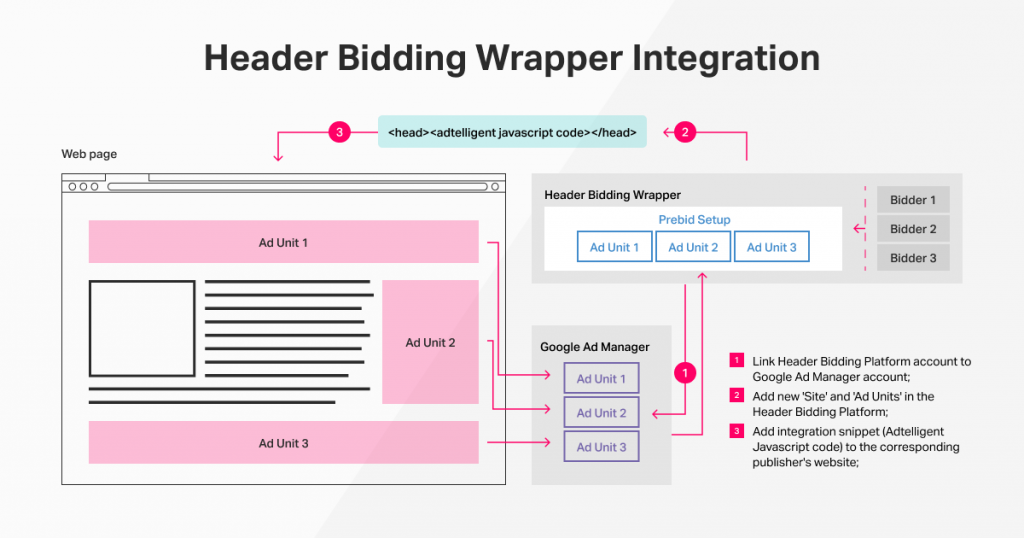
If the benefits of header bidding seem alluring, then you might be interested in getting to know the technology a bit closer. One can manage the flow of header bidding auctions through a header bidding wrapper, also called a container or a framework. The solution aims to manage multiple demand partners, set the rules for the auction, and gather valuable analytics.
It is also relatively easy to implement. The wrapper is a Javascript tag that in default logic, should be included in the <head> section of the webpage (though there are variations in the implementation logic, with Footer Bidding, for instance), and it makes asynchronous calls to demand partners. This solution was created to ease header bidding integration and avoid additional coding.
Types of header bidding wrappers
There are three types of header bidding wrappers in terms of the ad serving logic for the auction participants – client-side, service-side, and hybrid that combines both options.
The client-side wrapper allows a user’s browser to call different partners in parallel when visiting the publisher’s website. These partners then tell their bids before the loading of the page. The software then picks the auction’s winner and passes the results to Google Ad Manager. Finally, the bidding itself happens on the user’s browser. Note: advertisers can bid more efficiently, but the page load speed increases as more demand partners are added to the auction, which may influence the UX of the web source.
The server-side wrapper (S2S) sends a single call to the prebid server instead of the separate request to each demand partner independently from the viewer’s browser; in this case, the bidding occurs on the prebid server. Note: advertisers bid less efficiently, but the page latency improves thanks to a single call to all bidders and the third-party bidding side.
Hybrid wrapper: a combination of Server-side and Client-side header bidding, calibrating the settings to achieve the best results suitable for their ad and site performance needs.
Benefits of the header bidding platform
Each type of wrapper can be set up per the client’s needs; however, more holistic solutions like Adtelligent Header Bidding Platform are also available. Besides those mentioned above, traditional benefits of header bidding also include such features as:
- Easy setup. It should be implemented only once, and there is no need to replace the script every time any changes are made.
- Simple control with a unified interface.
- Automatic integration with GAM (Google Ad Manager) as a primary ad server. All setup entities are automatically created in Google Ad Manager. (Integration without Google Ad Manager is also a working option).
- Detailed reporting. Analytics in real-time with customizable data granularity omitting the need for the separate analytic prebid adapter.
- Complete control over ad auction. Such auction rules as levels of timeouts, bid adjustments, allowlists/blocklists for GEOs/sizes, and others. Settings are easily personalized to fit every publisher’s specific requirements.
- Multiple formats. Both banner and video formats are available, as well as display formats.
- Different types of wrappers. Client, Server, and Hybrid models can either choose from or combine to unlock the maximum potential.
- Core Web Vitals friendly. It is the primary benchmark that modern publishers are looking for in an advertising partner.
- Includes automated performance and floor optimization that ensures the highest yield with minimal impact on vital metrics and site performance.
- Built-in Adtelligent Marketplace. It gives direct access to the world’s biggest buyers.
- Pre-integrated Bidder Management. Publishers can integrate unlimited amounts of demand partners as prebid bidders or via RTB.
Usually, header bidding platforms have a string of included beneficial functionalities and features; for instance, Adtelligent comes with all publicly available prebid partners and built-in modules to help web publishers with currency conversion, GDPR, and user identification segmenting.
How to set up the header bidding platform?
As we have already mentioned, Adtelligent Header Bidding Platform is pretty easy to implement and does not require any developer’s work or advanced coding knowledge. So here are the first steps you can make to integrate header bidding, depending on the setting you already have.
The process of header bidding integration begins with getting a primary ad server that determines an auction winner and ensures ad rendering. If you do not have one, ad slots need to be set up on the page to show ads. Usually, it is Google Ad Manager, formerly Doubleclick for publishers, aka DFP. The process is pretty simplistic and does not require any advanced technical knowledge. Anyone with a computer can do that, as you can see in the instructions below.
Setting up Google Ad Manager account with Adtelligent Header Bidding Platform
Since advertisements served via prebid logic are also participating in GAM auctions, connecting the GAM account to the Header Bidding Platform is necessary to ensure that the auction would follow the targeting rules applied on the GAM side.
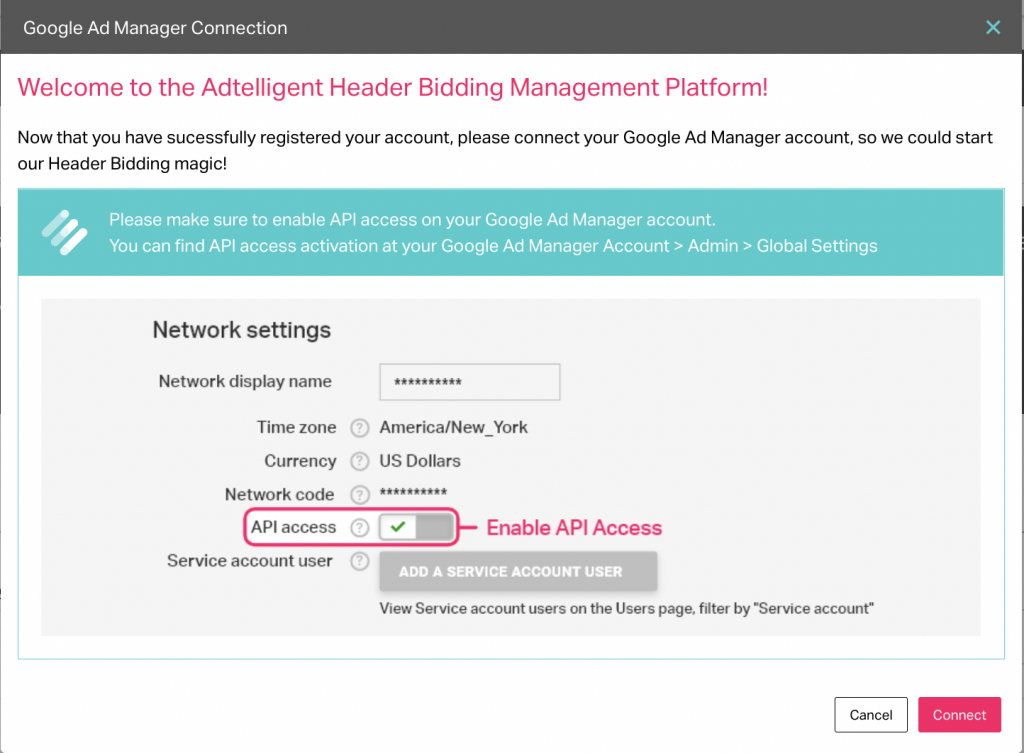
This is the first window you will see upon login:
To create the necessary infrastructure for header bidding auction automatically, there should be granted access to API in your GAM account.
- Press Connect; you will see your GAM account login tab.
- Choose the account you want to connect.
- Upon the previous step completion, you will see the list of permissions required for the Header Bidding Platform.
- After the required permissions have been granted, linking between GAM account and the Adtelligent platform is over, and you will be redirected to your account for other settings set up.
At this stage, no additional steps or manual work is needed. The integration process is basically over. However, you can take a few extra steps to navigate and calibrate the platform, and we will show them below.
Adding new sites
The primary aggregation entity on our side is a “Site”. We shall provide you with a single JavaScript code per the website you operate on for your convenience by default, though multiple options are available.

Right after connecting your GAM account to the platform, it will ask to add new websites, as seen in the screenshot below:
Press Add New Site, and you will be redirected to the page where you can integrate your domain.
- Enter domain (1) – enter the domain name of your website that is connected with your GAM account.
- Google Ad Manager Network (2) – choose a relevant Google Ad Manager Network from a popup list.
- My AdUnits rely on Div Id’s (3) – check this box if you rely on div id in your ad placement setup (pattern of creating a single ad unit with different behaviors on different div id’s). Press Create (4) to save the site.

Go to the Sites tab (1) and press the Create button (2) for any further additions to the websites.

Ad Units creation
After adding a web source to the Header Bidding Platform, we can proceed to the next step and connect ad units. Fortunately, our Platform has useful Site Wizard functionality that allows for automatic ad units and the current site’s Prebid configuration parsing and import to reduce the manual workforce.
Automatic Site Wizard launch
As soon as Site Wizard finishes its proceedings (it can take several minutes), you will see the following window:
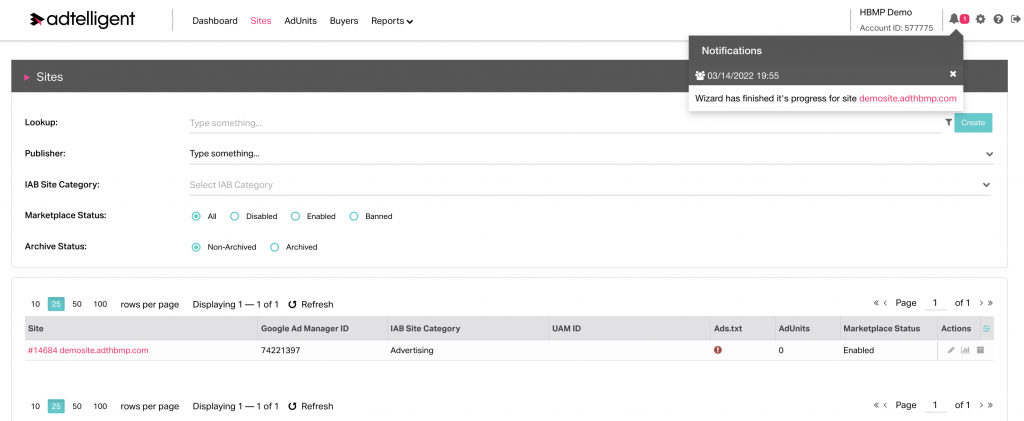
After clicking on the popup message, you will see Ad Units for the import menu:

- Google Ad Manager Ad Unit Code – Google Ad Manager units discovered on the page.
- Div ID – div id of relevant slots; make sure to press My AdUnits rely on div id’s during the site creation to implement this option.
- Buyers – the number of buyers from the current prebid configuration on the website.
- Click on Import to create chosen ad units with desired buyers; the connection between units and buyers will be set up automatically.
Adding New Buyer
The good news is that all partners that work with Adtelligent Header Bidding are already integrated with the Platform, and all you need to do is choose them from the list.

If you do not plan to add your Buyers and want to connect only to Adtelligent Marketplace, you can skip the next step.
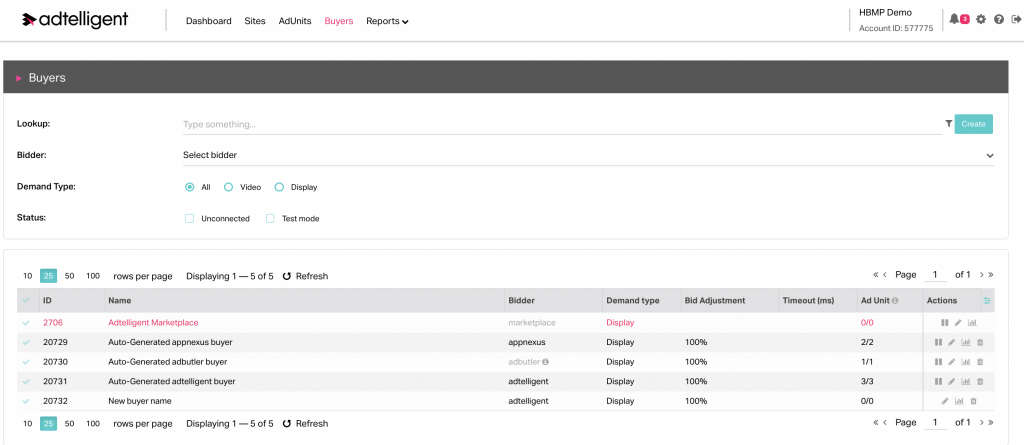
To add a buyer, you need to go to Buyers (1) tab and press Create (2).
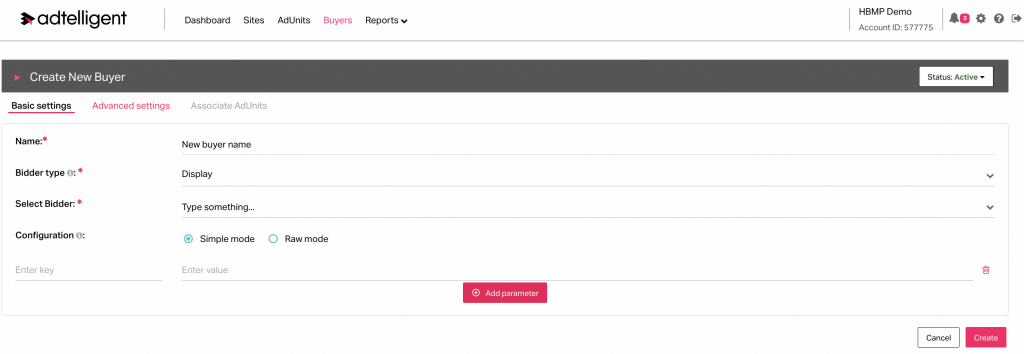
The following window with settings for adding a new buyer will appear:
- Name (1) – enter a buyer’s name here.
- Bidder type (2) – choose ad type from the list (Video/Display).
- Select bidder (3) – choose a partner’s adapter from the list of pre-integrated adapters.
- Configuration (4) – choose configuration type:
- Simple mode – for entering parameters within the interface’s field.
- Raw mode – is for parameters in JSON format.
- Parameter key-value (5):
- Enter key – after choosing the partner during the 3rd step, this field will be filled automatically with the necessary parameter. If needed, there is a chance to press the Add Parameter button and enter some additional parameters manually.
- Enter value – enter the provided parameter here.
- Press Create (6) in order to save this buyer.
Connecting Ad Units
Then we can go to the created buyer and press Edit to connect ad units:
Choose the Associate Ad Units tab and link the desired ones.

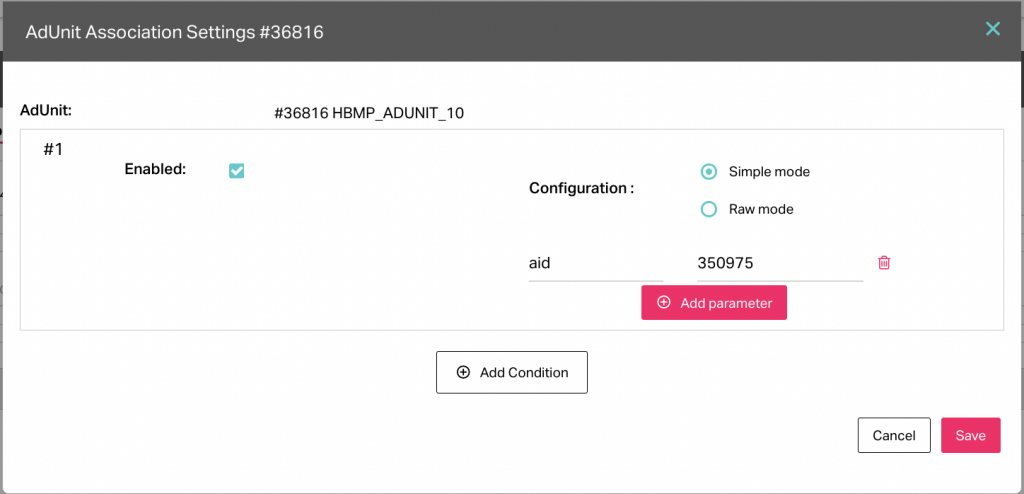
Press Add Association to the left from the chosen ad unit, and you will be redirected to the additional settings for it. You can set some specific parameters if provided by an ad partner.
The last step of the basic integration will be adding the snippet to the website.
Adding snippet to a site
To finish the platform integration process, one must integrate the advertising script with the page.
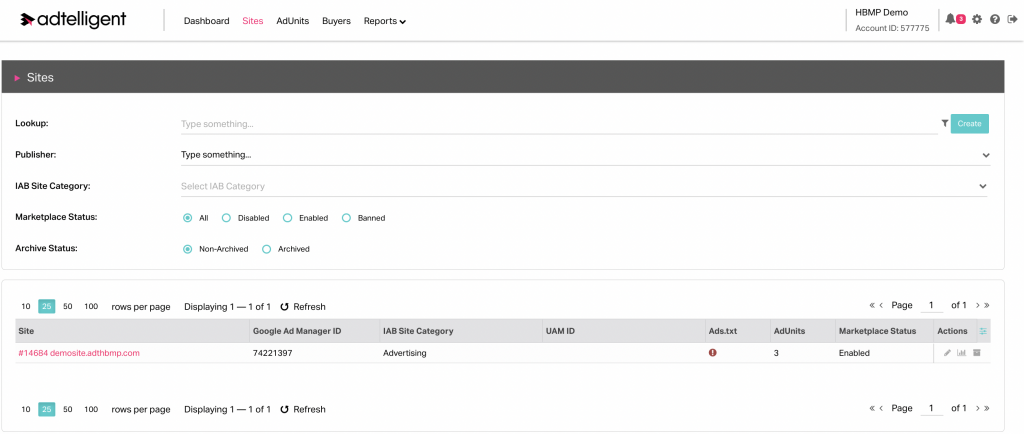
To do so, you need to go to Sites (1) tab and press Edit (2) to the right of the chosen site.
Integration Script Tab:
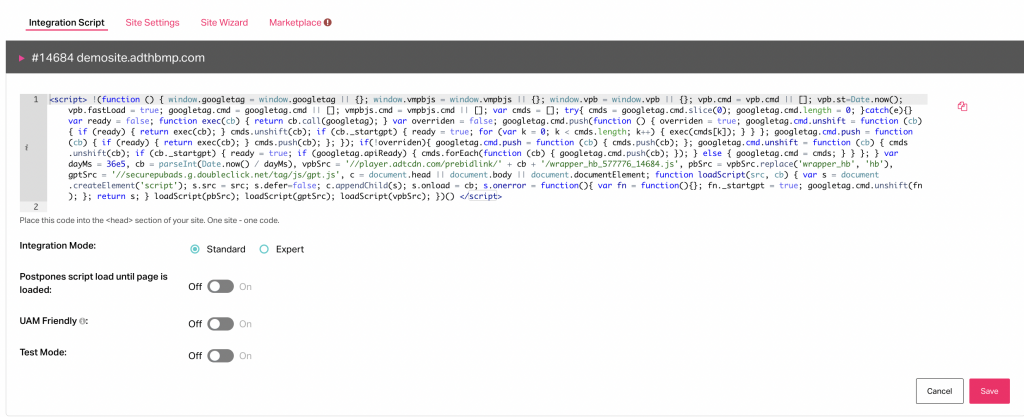
- Integration Script is generated for the requested site and needs to be integrated with the page.
- Integration mode (2) – integration scripts types:
- Standard – standard code must be placed in the <head> section of the page instead of the gpt.js script because the gpt.js script is generated within our snippet. This step is needed to launch the header bidding auction before Google’s auction. It also improves ad load speed on the page since scripts are loaded in parallel.
- Expert – header bidding script without calling for gpt.js. It must be integrated higher than gpt.js in the code.
- It is important to note that any kind of script has to be integrated into the <head> section of the page.
- UAM friendly – if you are working with Amazon Unified Marketplace we support parallel integration with UAM. All you need to do to access this functionality is to turn on this option, enter your UAM pub id, and integrate generated code with the page. You can also send custom schain data in the following format:
{
  "complete": "1",
  "ver": "1.0",
  "nodes": [
    {
      "asi": "value",
      "sid": "value",
      "hp": 1
    }
  ]
}
- Test mode – allows launching an auction with the chosen percentage of traffic.
The need to integrate a snippet code comes only once – no further code placing is required. After that, if you want to change any configurations, they will be added automatically by the platform, without additional coding or any manual work.
If you want to know more about any step of the auction process and get some intel, you can go to the Reports tab and get all the data you need. In addition, information on the metrics can be found here.

As you can see, the integration process is not that hard and can be easily done by a person that has nothing to do with coding. Adtelligent Header Bidding Platform does pretty much all the work for you. With the help of several useful tools such as Site Wizard and others, all the essential processes are automated and the interface navigation is intuitive.
Conclusion
Header bidding has been steadily winning over the hearts of both advertisers and publishers in recent years. The technology has been dubbed a future of ad tech, and rightfully so – it maximizes the profits for publishers of any size and optimizes the process of ad buying for advertisers, making it more transparent and accessible. The relevance of the technology is undeniable, especially considering the easy integration process, page speed optimization, and the reduced need for additional human resources. In addition, the ability to customize header bidding platforms to the specific needs of each particular business only makes it even more attractive for publishers and advertising alike.
[ad_2]
Source link


