A key objective of building a DevOps culture is delivering software quickly. However, you need to see where you’re going and where you are at to ensure you’re not rapidly heading into a brick wall. That’s why a core tenet of DevOps is measurement. You need to observe your environment to know you’re not building an environment like this:

The solution is to instrument your software and infrastructure wherever possible. Datadog is a market-leading platform for observing systems, offering advanced monitoring and analytics for software and infrastructure performance. At AdAction, we’ve rolled out Datadog to all of our systems, and I’d like to walk you through our experience, talking through the successes and pitfalls we encountered. Hopefully, along the way, this will provide you with some value.
Instrumenting
To begin our observability journey, we first needed to instrument all the things.
Integrate AWS
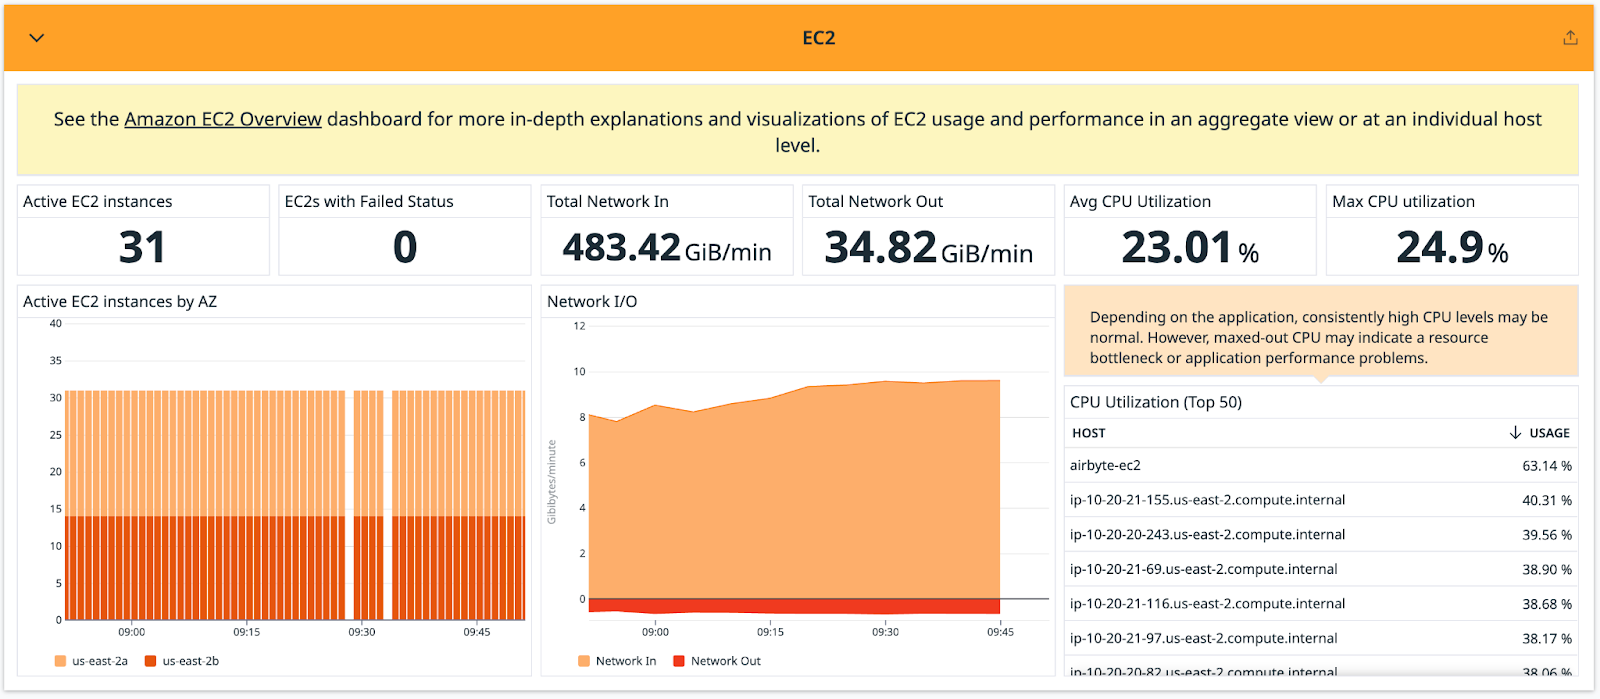
Luckily, Datadog can collect a wealth of data about your architecture out of the box when you’re in the cloud. \ We’re on AWS, so we were able to hit the ground running. A bit of setup is involved, which you can find detailed in this Datadog support article. The setup was effortless and straightforward for us. As long as you have an IAM user configured with the correct permissions, it takes just a few minutes to load up a cloud formation template, and then you’ll have data like this coming in:
Airbyte
We have non-AWS provided systems we’d also like to instrument. One such system is Airbyte, which we self-host on a standalone EC2 instance. There are plenty of Airbyte-specific metrics we’d be very interested in (number of jobs, long-running jobs) and AWS EC2 metrics like host health and network. Luckily, Datadog offers an Airbyte integration to pull in the Airbyte-specific metrics. We get the EC2 metrics automatically from the AWS integration but need to install a Datadog agent on the host to collect the Airbyte information. We are firm believers in infrastructure as code, so we didn’t want to do this installation and configuration manually but instead integrated it into the user_data to provision the Airbyte EC2 instance. Here is the relevant section of our EC2 user_data:
# Configure Datadog Integration
mkdir /home/ec2-user/datadog && cd /home/ec2-user/datadog

echo ‘dogstatsd_mapper_profiles:’ >> /home/ec2-user/datadog/datadog.yaml

echo ‘  – name: airbyte_worker’ >> /home/ec2-user/datadog/datadog.yaml

echo ‘    prefix: “worker.”‘ >> /home/ec2-user/datadog/datadog.yaml

echo ‘    mappings:’ >> /home/ec2-user/datadog/datadog.yaml

echo ‘      – match: “worker.temporal_workflow_*”‘ >> /home/ec2-user/datadog/datadog.yaml

echo ‘        name: “airbyte.worker.temporal_workflow.$1″‘ >> /home/ec2-user/datadog/datadog.yaml

echo ‘      – match: “worker.worker_*”‘ >> /home/ec2-user/datadog/datadog.yaml

echo ‘        name: “airbyte.worker.$1″‘ >> /home/ec2-user/datadog/datadog.yaml

echo ‘      – match: “worker.state_commit_*”‘ >> /home/ec2-user/datadog/datadog.yaml

echo ‘        name: “airbyte.worker.state_commit.$1″‘ >> /home/ec2-user/datadog/datadog.yaml

echo ‘      – match: “worker.job_*”‘ >> /home/ec2-user/datadog/datadog.yaml

echo ‘        name: “airbyte.worker.job.$1″‘ >> /home/ec2-user/datadog/datadog.yaml

echo ‘      – match: “worker.attempt_*”‘ >> /home/ec2-user/datadog/datadog.yaml

echo ‘        name: “airbyte.worker.attempt.$1″‘ >> /home/ec2-user/datadog/datadog.yaml

echo ‘      – match: “worker.activity_*”‘ >> /home/ec2-user/datadog/datadog.yaml

echo ‘        name: “airbyte.worker.activity.$1″‘ >> /home/ec2-user/datadog/datadog.yaml

echo ‘      – match: “worker.*”‘ >> /home/ec2-user/datadog/datadog.yaml

echo ‘        name: “airbyte.worker.$1″‘ >> /home/ec2-user/datadog/datadog.yaml

echo ‘  – name: airbyte_cron’ >> /home/ec2-user/datadog/datadog.yaml

echo ‘    prefix: “cron.”‘ >> /home/ec2-user/datadog/datadog.yaml

echo ‘    mappings:’ >> /home/ec2-user/datadog/datadog.yaml

echo ‘      – match: “cron.cron_jobs_run”‘ >> /home/ec2-user/datadog/datadog.yaml

echo ‘        name: “airbyte.cron.jobs_run”‘ >> /home/ec2-user/datadog/datadog.yaml

echo ‘      – match: “cron.*”‘ >> /home/ec2-user/datadog/datadog.yaml

echo ‘        name: “airbyte.cron.$1″‘ >> /home/ec2-user/datadog/datadog.yaml

echo ‘  – name: airbyte_metrics_reporter’ >> /home/ec2-user/datadog/datadog.yaml

echo ‘    prefix: “metrics-reporter.”‘ >> /home/ec2-user/datadog/datadog.yaml

echo ‘    mappings:’ >> /home/ec2-user/datadog/datadog.yaml

echo ‘      – match: “metrics-reporter.*”‘ >> /home/ec2-user/datadog/datadog.yaml

echo ‘        name: “airbyte.metrics_reporter.$1″‘ >> /home/ec2-user/datadog/datadog.yaml

echo ‘  – name: airbyte_orchestrator’ >> /home/ec2-user/datadog/datadog.yaml

echo ‘    prefix: “orchestrator.”‘ >> /home/ec2-user/datadog/datadog.yaml

echo ‘    mappings:’ >> /home/ec2-user/datadog/datadog.yaml

echo ‘      – match: “orchestrator.*”‘ >> /home/ec2-user/datadog/datadog.yaml

echo ‘        name: “airbyte.orchestrator.$1″‘ >> /home/ec2-user/datadog/datadog.yaml

echo ‘  – name: airbyte_server’ >> /home/ec2-user/datadog/datadog.yaml

echo ‘    prefix: “server.”‘ >> /home/ec2-user/datadog/datadog.yaml

echo ‘    mappings:’ >> /home/ec2-user/datadog/datadog.yaml

echo ‘      – match: “server.*”‘ >> /home/ec2-user/datadog/datadog.yaml

echo ‘        name: “airbyte.server.$1″‘ >> /home/ec2-user/datadog/datadog.yaml

echo ‘  – name: airbyte_general’ >> /home/ec2-user/datadog/datadog.yaml

echo ‘    prefix: “airbyte.”‘ >> /home/ec2-user/datadog/datadog.yaml

echo ‘    mappings:’ >> /home/ec2-user/datadog/datadog.yaml

echo ‘      – match: “airbyte.worker.temporal_workflow_*”‘ >> /home/ec2-user/datadog/datadog.yaml

echo ‘        name: “airbyte.worker.temporal_workflow.$1″‘ >> /home/ec2-user/datadog/datadog.yaml

echo ‘      – match: “airbyte.worker.worker_*”‘ >> /home/ec2-user/datadog/datadog.yaml

echo ‘        name: “airbyte.worker.$1″‘ >> /home/ec2-user/datadog/datadog.yaml

echo ‘      – match: “airbyte.worker.state_commit_*”‘ >> /home/ec2-user/datadog/datadog.yaml

echo ‘        name: “airbyte.worker.state_commit.$1″‘ >> /home/ec2-user/datadog/datadog.yaml

echo ‘      – match: “airbyte.worker.job_*”‘ >> /home/ec2-user/datadog/datadog.yaml

echo ‘        name: “airbyte.worker.job.$1″‘ >> /home/ec2-user/datadog/datadog.yaml

echo ‘      – match: “airbyte.worker.attempt_*”‘ >> /home/ec2-user/datadog/datadog.yaml

echo ‘        name: “airbyte.worker.attempt.$1″‘ >> /home/ec2-user/datadog/datadog.yaml

echo ‘      – match: “airbyte.worker.activity_*”‘ >> /home/ec2-user/datadog/datadog.yaml

echo ‘        name: “airbyte.worker.activity.$1″‘ >> /home/ec2-user/datadog/datadog.yaml

echo ‘      – match: “airbyte.cron.cron_jobs_run”‘ >> /home/ec2-user/datadog/datadog.yaml

echo ‘        name: “airbyte.cron.jobs_run”‘ >> /home/ec2-user/datadog/datadog.yaml

export DATADOG_API=$(aws secretsmanager get-secret-value –secret-id production/airbyte/datadog –query SecretString –output text –region us-east-2)

export DATADOG_API_KEY=$(echo $DATADOG_API | grep -o ‘”key”:”[^”]*’ | grep -o ‘[^”]*$’)

sudo sed -i “/- airbyte-api-server/a\  dd-agent:\n    container_name: dd-agent\n    image: gcr.io/datadoghq/agent:7\n    pid: host\n    environment:\n      – DD_API_KEY=${DATADOG_API_KEY}\n      – DD_SITE=datadoghq.com\n      – DD_HOSTNAME=airbyte-ec2\n      – DD_DOGSTATSD_NON_LOCAL_TRAFFIC=true\n    volumes:\n      – /var/run/docker.sock:/var/run/docker.sock\n      – /proc/:/host/proc/:ro\n      – /sys/fs/cgroup:/host/sys/fs/cgroup:ro\n      – /home/ec2-user/datadog/datadog.yaml:/etc/datadog-agent/datadog.yaml\n    networks:\n      – airbyte_internal\n  metric-reporter:\n    image: airbyte/metrics-reporter:\${VERSION}\n    container_name: metric-reporter\n    networks:\n      – airbyte_internal\n    environment:\n      – DATABASE_PASSWORD=\${DATABASE_PASSWORD}\n      – DATABASE_URL=\${DATABASE_URL}\n      – DATABASE_USER=\${DATABASE_USER}\n      – DD_AGENT_HOST=\${DD_AGENT_HOST}\n      – DD_DOGSTATSD_PORT=\${DD_DOGSTATSD_PORT}\n      – METRIC_CLIENT=\${METRIC_CLIENT}\n      – PUBLISH_METRICS=\${PUBLISH_METRICS}” /home/ec2-user/airbyte/docker-compose.yaml

sudo sed -i “s/PUBLISH_METRICS=false/PUBLISH_METRICS=true/” /home/ec2-user/airbyte/.env

sudo sed -i “s/METRIC_CLIENT=/METRIC_CLIENT=datadog/” /home/ec2-user/airbyte/.env

sudo sed -i “s/DD_AGENT_HOST=/DD_AGENT_HOST=dd-agent/” /home/ec2-user/airbyte/.env

sudo sed -i “s/DD_DOGSTATSD_PORT=/DD_DOGSTATSD_PORT=8125/” /home/ec2-user/airbyte/.env

unset DATADOG_API_KEY
Early APM Adoption
The visibility afforded by the Datadog AWS integration was excellent. However, we still needed insights into how our application code was running. Here is where Application Performance Monitoring (APM) comes in handy. APM gives visibility to the actual code execution, including traces of slow responses, lists of errors, and flame graphs. We wanted to know how our code was running.
Unfortunately, the APM setup didn’t go nearly as smoothly for us as the AWS integration. We are primarily a PHP shop (Laravel specifically), and at the time, there was no easy-to-install APM tool for PHP.
First, our Nginx configuration was outdated and needed to be updated. Once that was fixed, we still needed to have the AWS CLI command configured correctly in our Elastic Beanstalk environments to pull the DD app key from AWS Secrets Manager. Once that was set, we would pull down the script to run it as part of our platform deployment hooks. Unfortunately, in our initial attempts, we weren’t installing the agent at the right time in the bootup of our Beanstalk. (At the time, Datadog’s only instructions for Elastic Beanstalk used `.ebextensions,` so we were flying a little blind.) It turns out that the install script needed to be run in the last pre-deploy step. Once all of that was sorted out, we had this pre-deploy hook script:
#!/bin/bash
echo "Installing Datadog Agent and Log Collection"
set -ev


# Setup Linux Agent
if ! command -v datadog-agent &> /dev/null; then
   # download datadog install script and give proper permissions and ownership
   curl -L https://s3.amazonaws.com/dd-agent/scripts/install_script_agent7.sh -o datadog_install_script.sh
   chown root:root datadog_install_script.sh
   chmod +x datadog_install_script.sh
   chmod 700 datadog_install_script.sh


   # copy datadog.yaml to /etc/datadog-agent/datadog.yaml and give proper permissions and ownership
   mkdir -p /etc/datadog-agent
   cp .platform/hooks/predeploy/datadog/datadog.yaml /etc/datadog-agent/datadog.yaml
   chown root:root /etc/datadog-agent/datadog.yaml
   chmod 640 /etc/datadog-agent/datadog.yaml


   # get datadog secret information from AWS Secrets Manager
   DD_SECRET=$(aws secretsmanager get-secret-value --secret-id $DATADOG_SECRET_ARN --query SecretString --output text --region us-east-2)


   # export datadog agent version as environment variables
   export DD_AGENT_MAJOR_VERSION="7"
   export DD_AGENT_MINOR_VERSION=""


   # export datadog secret information as environment variables
   DD_API_KEY=$(jq -r ".DD_API_KEY" <<< $DD_SECRET) && export DD_API_KEY=$DD_API_KEY
   DD_SITE=$(jq -r ".DD_SITE" <<< $DD_SECRET) && export DD_SITE=$DD_SITE


   # Add proper API key to datadog.yaml and enable logs
   sed -i "s/DD_API_KEY/$DD_API_KEY/" /etc/datadog-agent/datadog.yaml
   sed 's/# logs_enabled: false/logs_enabled: true/' -i /etc/datadog-agent/datadog.yaml


   # Copy datadog-agent directory to /etc/datadog-agent.d so logs can be collected
   rsync -a .platform/hooks/predeploy/datadog/datadog-agent/ /etc/datadog-agent/conf.d/


   # Run install script
   DD_API_KEY=unused /var/app/staging/datadog_install_script.sh; sed -i 's/ install_script/ ebs_install_script/' /etc/datadog-agent/install_info


   echo "Datadog Agent and Log Collection installed"
else
   echo "DataDog Agent and Log Collection already installed!"
fi


# Setup PHP APM
if [ ! -f /etc/php.d/98-ddtrace.ini ]; then
   # Install datadog php extension
   curl -LO https://github.com/DataDog/dd-trace-php/releases/latest/download/datadog-setup.php
   php datadog-setup.php --php-bin=all --enable-profiling


   # Restart php-fpm so extension is loaded
   sudo systemctl restart php-fpm
else
   echo "DataDog APM Extension already installed!"
fi


echo "Datadog and Log Collection Installed"
RUM
Beyond our PHP server applications, we have an Android app called Cosmic Rewards. We, of course, wanted to see how the app was running as well. Luckily, Datadog has a Real User Monitoring feature, analogous to APM, but for mobile apps. Setting it up was not trivial, but it was well worth it.
We use Okhttp (Retrofit), and Datadog needs a specific dependency to work with it. Additionally, it can give granular network visibility if you put some custom interceptors in place (which we really wanted to do). Here is the dependency using version catalog:
datadog-okhttp = { module = "com.datadoghq:dd-sdk-android-okhttp", version.ref = "datadog" }
And here is the update to add the custom interceptors in `OkHttpClient.Builder()`:
  .addInterceptor(
               DatadogInterceptor(
                   firstPartyHosts = listOf(buildConfigInfo.apiHostName),
                   traceSampler = RateBasedSampler(20f)
               )
           )
           .addNetworkInterceptor(
               TracingInterceptor(
                   tracedHosts = listOf(buildConfigInfo.apiHostName),
                   traceSampler = RateBasedSampler(20f)
               )
           )
We also ran into a problem with our obfuscated source code. We needed to create a mapping file for each app version to make sense of the Datadog results. We used the Datadog gradle plugin, which provides a Gradle task for uploading the mapping. Here we add the Gradle plugin:
datadog = { id = "com.datadoghq.dd-sdk-android-gradle-plugin", version.ref = "datadogGradlePlugin" }
Then we need to apply it to the app module `build.gradle`:
alias libs.plugins.datadog
Then, when we sync gradle under the `app.datadog` folder, we have tasked generated, one per build type. We execute the task after building the release build. We run `./gradlew uploadMappingRelease` after running `./gradlew assembleRelease.` We automate this in our CI system.
We also wanted to get detailed information and tracking for screen views and used Datadog’s Mixed view tracking strategy to do so. In `RumConfiguration.Builder()` we added:
RumConfiguration.Builder(applicationId)
// ...
           .useViewTrackingStrategy(MixedViewTrackingStrategy(trackExtras = true))
           .build()
With this, we’re able to track Activities, Fragments, and also the extras, such as arguments passed across screens.
Now that we have fully set up RUM, one of our favorite things is how helpful it is to debug Application Not Responding (ANR) issues. ANRs are one of the most challenging issues to debug, and Datadog makes it easier than other platforms to spot the root cause.
APM Everywhere
Now that we’d pioneered Datadog APM use in one system, it was time to bring it into all of our server applications. Being firm believers in a DevOps culture, we felt the individual scrum teams should take it upon themselves to integrate APM rather than rely on our Continuous Improvement team. We worked with the product managers to schedule the work, and the teams tackled it like any other feature development. Luckily, with the work done with our first APM integration, it was much more trivial to bring Datadog APM on board with our new pre-deploy script.
Custom Metrics
At this point, we had all of our application performance monitored. What we didn’t have was a single pane of glass to look at for the total health of our business. We needed to instrument the important business events within our systems to get there. Datadog custom metrics are a feature perfect for tracking stats beyond just the application. Once again, we divvied the work of integrating custom metrics up to the teams. The teams are using the open-source project laravel-datadog-helper, which has greatly simplified the process of tracking custom metrics. The helper was installed using composer:
09:01:59  ~/dev/adgem_api  ⬡ v20.5.1  ? php-8.1.22   Setup_Updates ✘ ✭  6s
$
composer require chaseconey/laravel-datadog-helper
./composer.json has been updated
Running composer update chaseconey/laravel-datadog-helper
Loading composer repositories with package information
Updating dependencies
Lock file operations: 2 installs, 0 updates, 0 removals
 - Locking chaseconey/laravel-datadog-helper (1.2.1)
 - Locking datadog/php-datadogstatsd (1.4.1)
Writing lock file
Installing dependencies from lock file (including require-dev)
Package operations: 2 installs, 0 updates, 0 removals
 - Installing datadog/php-datadogstatsd (1.4.1): Extracting archive
 - Installing chaseconey/laravel-datadog-helper (1.2.1): Extracting archive


…


Using version ^1.2 for chaseconey/laravel-datadog-helper
composer require chaseconey/laravel-datadog-helper  4.16s user 0.85s system 23% cpu 21.445 total
We made a few minor tweaks to the configuration:
First, we set up a prefix for our metrics to help us distinguish between the same (or similarly named) metrics across multiple projects:
   /*
   |--------------------------------------------------------------------------
   | Datadog Tracking Prefix
   |--------------------------------------------------------------------------
   |
   | This is the prefix that will be placed in front of all of your metric entries. If you have multiple
   | applications being tracked in Datadog, it is recommended putting the application name somewhere
   | inside of your prefix. A common naming scheme is something like app.<app-name>.
   |
   */
   'prefix' => env('DD_METRIX_PREFIX', 'service-hub'), // metrics prefix
We also needed to ensure we pulled in the correct Datadog App key that we configured in our pre-deploy script above:
   'api_key' => env('DD_API_KEY', null),


   'application_key' => env('DD_APP_KEY', null),
Tracking custom metrics was straightforward, particularly with the laravel-datadog-helper:
Datadog::increment('support_case.created');
We were able to tap into the power of Eloquent model events to fire our Datadog custom metrics.
We created a custom event dispatcher:
   public function player(): BelongsTo
   {
       return $this->belongsTo(Player::class)->withTrashed();
   }


   public function campaign(): BelongsTo
   {
       return $this->belongsTo(Campaign::class);
   }


   public function scopeForPlayer(Builder $query, string $playerId): void
   {
       $query->where('player_id', $playerId);
   }
Wrote a subscriber for our new events:
<?php


namespace App\Listeners;


use App\Events\ClickCreated;
use App\Events\ConversionCreated;
use App\Events\NewUserRegistration;
use App\Support\Facades\Features;
use ChaseConey\LaravelDatadogHelper\Datadog;
use Illuminate\Events\Dispatcher;


class DataDogSubscriber
{
   public function handleConversionCreated(ConversionCreated $event): void
   {
       Datadog::increment('conversions.created.'.$event->conversion->status->value);
   }


   public function handleClickCreated(): void
   {
       Datadog::increment('clicks.created');
   }


   public function handleNewUserRegistration(): void
   {
       Datadog::increment('players.created');
   }


   /**
    * Register the listeners for the subscriber.
    *
    * @return array<string, string>
    */
   public function subscribe(Dispatcher $events): array
   {
       return [
           ConversionCreated::class => 'handleConversionCreated',
           ClickCreated::class => 'handleClickCreated',
           NewUserRegistration::class => 'handleNewUserRegistration',
       ];
   }
}
and registered our subscriber to in the EventServiceProvider:
namespace App\Providers;
use App\Listeners\DataDogSubscriber;


use Illuminate\Foundation\Support\Providers\EventServiceProvider as ServiceProvider;


class EventServiceProvider extends ServiceProvider
{
   /**
    * The event listener mappings for the application.
    *
    * @var array<class-string, array<int, class-string>>
    */
   protected $listen = [
       // ...
   ];


   /**
    * The subscriber classes to register.
    *
    * @var array<class-string>
    */
   protected $subscribe = [
       // ...
       DataDogSubscriber::class,
   ];


   /**
    * The model observers for your application.
    *
    * @var array<class-string, array<int, class-string>>
    */
   protected $observers = [
       // ...
   ];
}
Monitoring
Once we had instrumentation, we needed to do something with it. Collecting the data does very little if you aren’t able to do something with it.
Dashboards
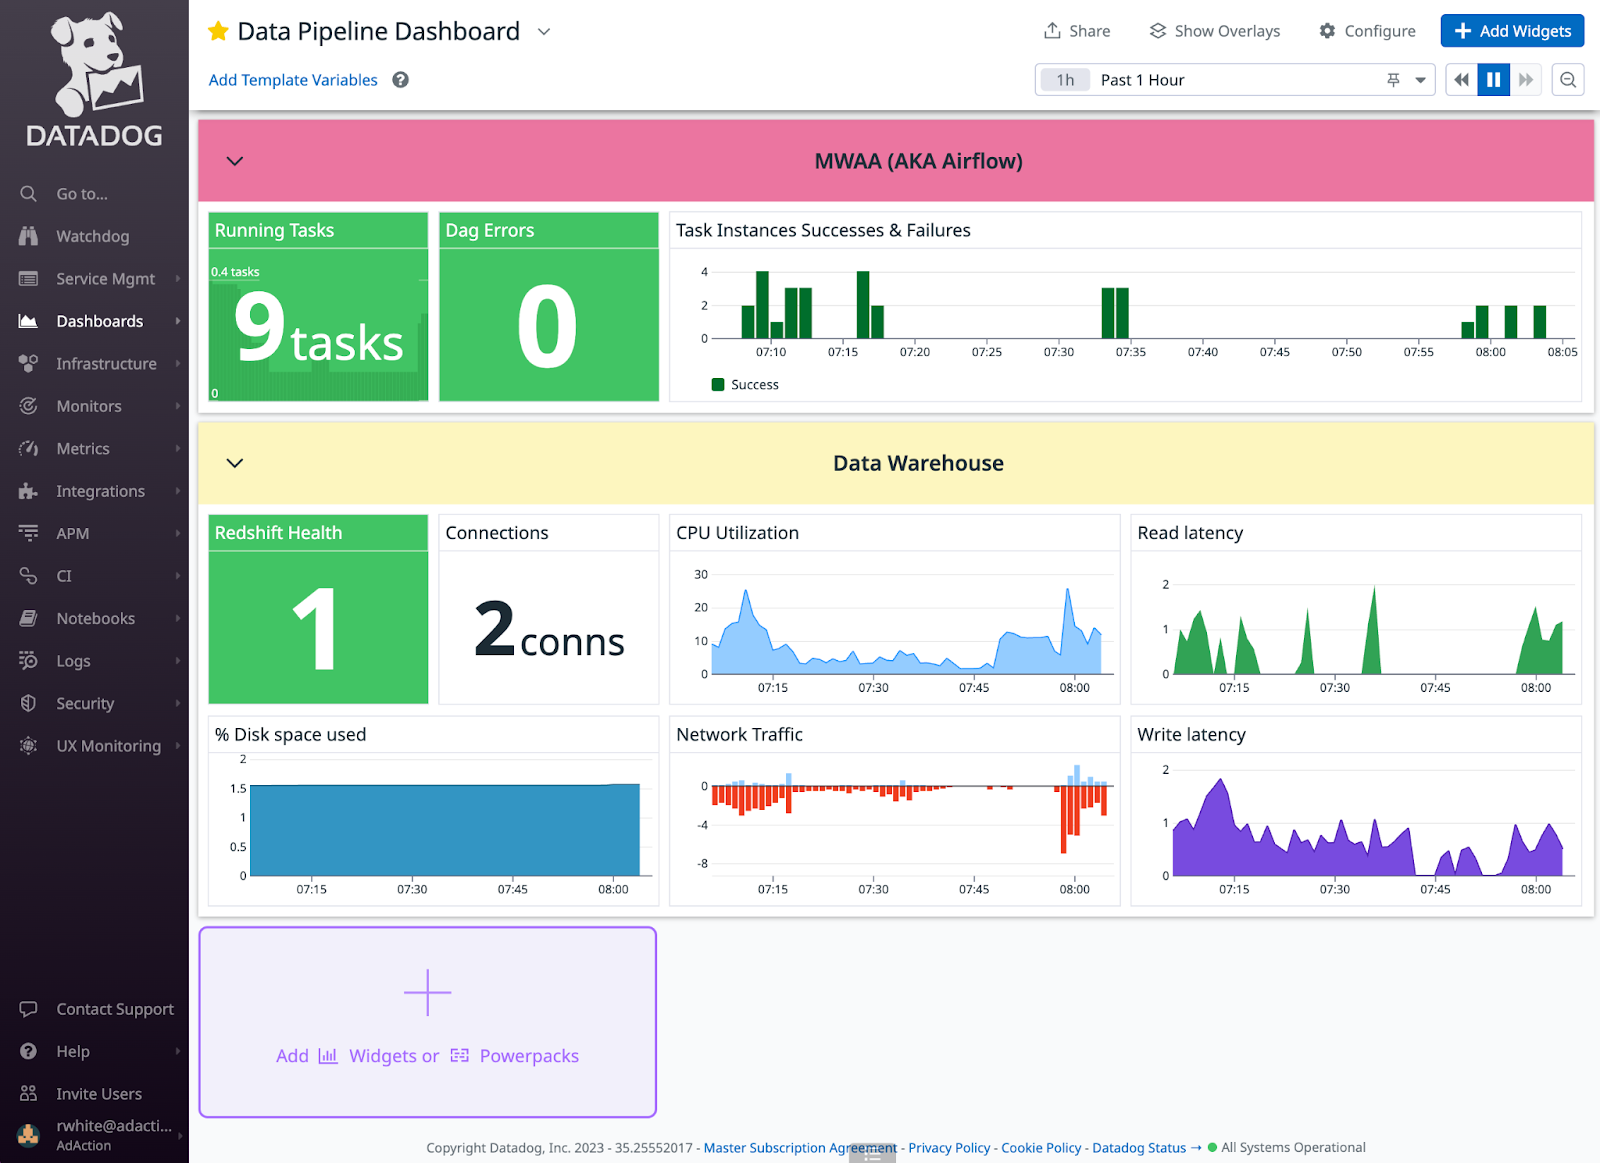
It was time to build our single pane of glass to see the health of our systems at a glance. Enter Datadog Dashboards. You can pull arbitrary metrics, graphs, and visuals together into a single stop. They have widgets for time series, charts, arbitrary query values, heatmaps; the list goes on and on. Here is a dashboard we built for our data pipeline:
Monitors
Dashboards are great, but short of a 24/7 operations team, you won’t be looking at the dashboard at all times. You need to know when it requires your attention. Datadog monitors to the rescue. Datadog allows you to alert on a wide range of conditions. You can create monitors for metrics breaching thresholds, for anomalies and outliers, for host status, for apm, and many more.
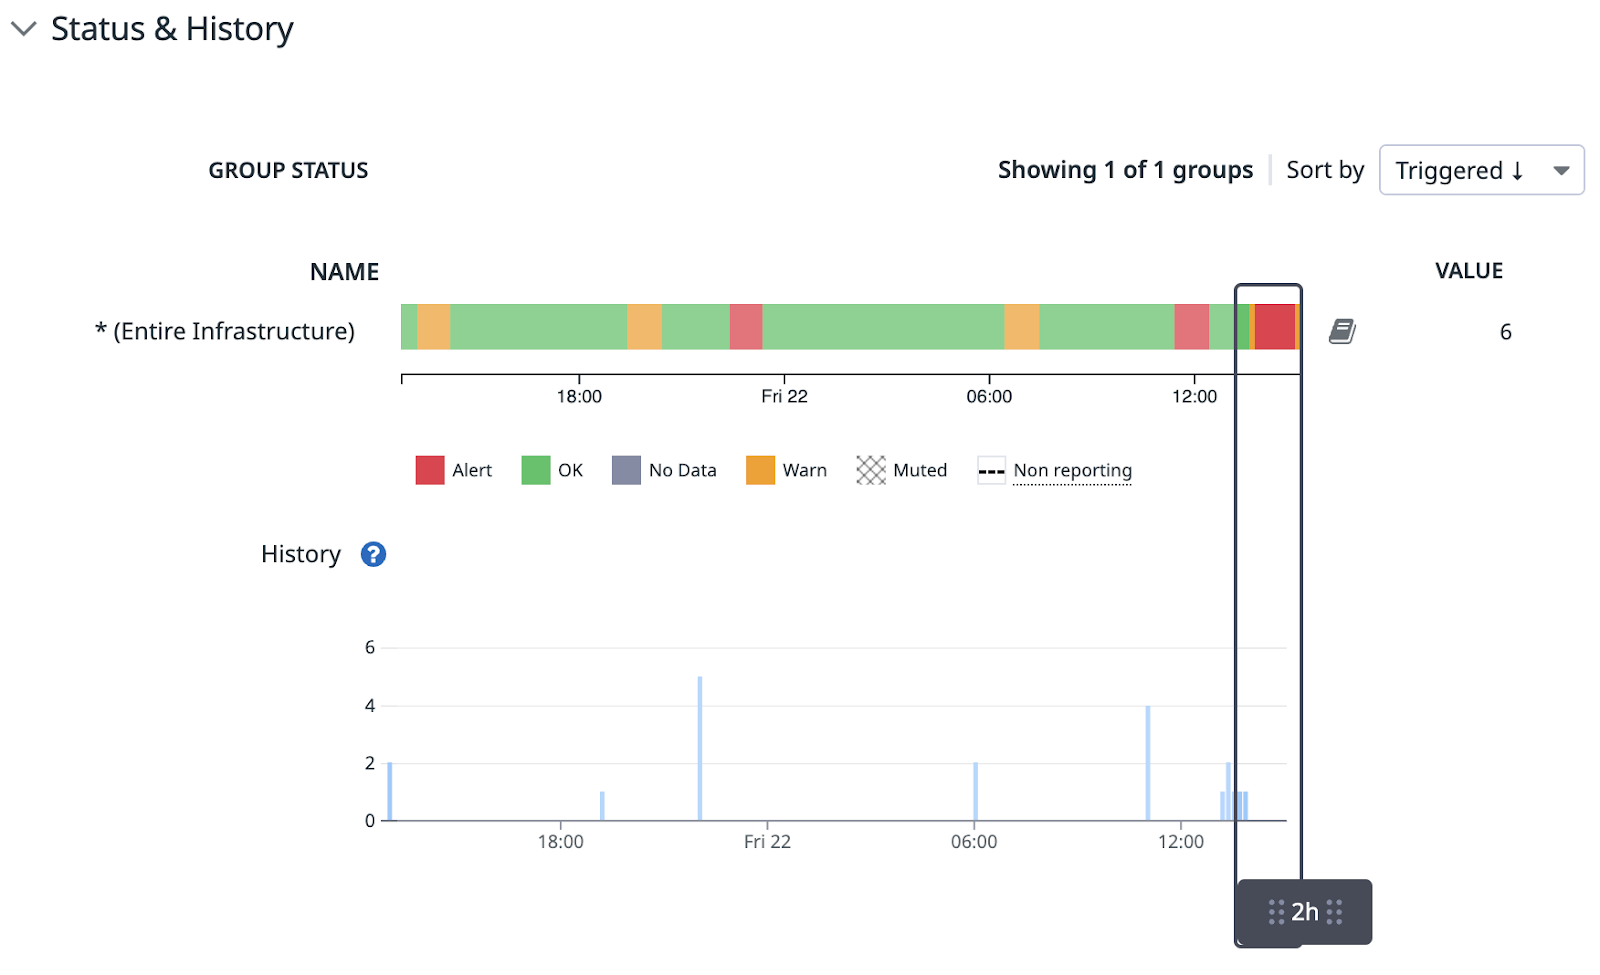
Here’s a monitor I set up for our AWS Managed Apache Airflow to alarm if we have too many failed tasks (as you can see, the 22nd was a little bumpy ?:
Nevertheless, with a multitude of monitors in place, we can go about our regular business confident that we will know of any issues as soon as they come up. Currently, we have alarms going to the alerts slack room for the respective team. In the future, we may implement an on-call rotation with a tool like PagerDuty. However, up to this point, our systems have been stable enough, and the teams are responsive enough that something formal hasn’t been necessary.
Up Next
We’re getting a lot out of Datadog, but we’ve only scratched the surface of what’s possible with this powerful platform. Here are a few areas we haven’t yet implemented but may explore with time.
DB Monitoring
High on our list of todos is Datadog’s enhanced Database monitoring. This will help us understand query bottlenecks in slow request traces. Datadog will present SQL Explain Plans for queries directly in the UI without visiting the SQL terminal and recreating the query.
However, as enticing as this feature is, implementing it won’t be as trivial as other Datadog features. To turn database monitoring on for Postgres RDS, you need to run some commands as the database admin, and, more importantly, will need to reboot the DB instance, necessitating an outage. We need to schedule this for downtime and haven’t pulled the trigger yet.
Android Replay Feature
We will implement the Android replay feature, which provides a visual retrospective of the user session, specifically what the user did before a crash or a particular moment.
Log Aggregation
Currently, we use Papertrail for Log management. Datadog has log aggregation and monitoring, but we haven’t felt any urgency to migrate over. We will explore this in the future.
Dora Metrics
Datadog’s beta support for DevOps Research and Assessment (Dora) metrics is equally exciting. Dora metrics are intended to inform teams if they are performing DevOps at an elite level. We plan to help our teams continuously improve using Dora metrics and have sought a way to gather and present these stats. With Datadog’s Dora Metrics feature we hope we’ve found the solution for both challenges. Stay tuned for a more in-depth blog post about our adventures with Dora metrics.
Looking Ahead
Our journey with Datadog has underscored the immense value robust instrumentation offers for both day-to-day agility and long-term resilience. Going from blindly firefighting production issues to proactive anomaly detection and informed root cause analysis unblocks teams and delights customers.
As capabilities continue evolving, we are eager to implement database monitors for granular query analysis, leverage mobile replay to reconstruct crashes, and potentially migrate log streams. Each innovation promises further gains. We are proud of the visibility our teams now wield to increase development velocity. But perhaps more importantly, we are confident that with comprehensive observability, our systems will gracefully scale and withstand inevitable turbulence ahead.

I am a Software Architect at AdAction. Currently, I’m primarily supporting the Data Team in its effort to build a modern data pipeline. I love problem-solving and consider myself a true polyglot. I have over 25 years of experience wrangling software and almost 10 wrangling children.